 ultimate-guide
Inspecting Used Excavators Before Buying: 7-Step Guide
Table of Contents
- Why Inspecting Used Excavators Matters
- Step 1: Review Service History and Operating Hours
- Step 2: Perform a Visual Inspection for Cracks, Dents, and Corrosion
- Step 3: Assess Excavator Undercarriage Wear and Track Condition
- Step 4: How to Check Hydraulic Pressure and Fluid Condition
- Step 5: Inspect Engine Components and Fluid Analysis
- Step 6: Test Performance Under Load and Verify Electrical Systems
- Used Excavator Inspection Checklist for Auction Purchases
- Frequently Asked Questions
Last Updated: August 17, 2026
Why Inspecting Used Excavators Matters
Inspecting used excavators before buying is the difference between acquiring reliable equipment and inheriting costly problems. Heavy machinery represents a significant capital investment, and a thorough inspection catches hidden damage, mechanical failures, and maintenance issues that could sideline your operation or drain your budget in unexpected repairs.
An excavator with undetected hydraulic leaks, worn track chains, or engine blow-by issues can cost thousands in repairs within weeks of purchase. Equipment failures delay projects, damage client relationships, and create safety hazards on job sites. According to OSHA guidelines on equipment maintenance and safety, inadequate equipment inspection practices increase workplace incident risk and liability exposure.
At EquipMarket, we've helped thousands of buyers navigate equipment purchases with confidence. This guide walks you through a systematic 7-step inspection process that covers the critical systems every used excavator buyer should evaluate.
Step 1: Review Service History and Operating Hours
Request the complete service history and maintenance logs from the seller before inspecting the machine in person. Operating hours are your first critical data point, they reveal how hard the equipment has been worked and whether it's been maintained on schedule.
Excavators typically have a useful life of 10,000 to 15,000 operating hours with proper maintenance. A machine with 8,000 hours serviced every 500 hours is far more reliable than one with 6,000 hours and no documented maintenance.
Look specifically for:
- Oil and coolant analysis reports
- Hydraulic fluid change dates and intervals
- Filter replacement documentation
- Major repairs or component replacements
- Track and undercarriage maintenance notes
A seller who can't produce maintenance logs is a red flag. Ask how many hours the excavator runs per year. A machine with 8,000 hours over eight years (1,000 annually) has experienced normal use; one with 8,000 hours over two years indicates heavy use and accelerated wear.
Step 2: Perform a Visual Inspection for Cracks, Dents, and Corrosion
Walk around the entire machine and document its external condition. Visual damage often signals deeper structural or operational issues. Cracks in the boom or arm indicate the machine has experienced stress beyond normal operating parameters.
Cab and Upper Structure:
- Inspect cab glass and structural welds for cracks
- Check door hinges and seals for corrosion
- Look for deep pitting corrosion on roof and sides
- Test all cab controls and gauges
Boom, Arm, and Bucket:
- Examine boom and arm for cracks, bends, or dents
- Check bucket teeth for excessive wear
- Inspect bucket pins and bushings for play
- Look for hydraulic fluid residue around cylinders, which signals leaks
Frame and Chassis:
- Walk the perimeter looking for cracks or warping
- Check all welds for cracks or separation
- Inspect the swing bearing for play or damage
Take photos and video of any damage. This documentation protects you in negotiations.

Step 3: Assess Excavator Undercarriage Wear and Track Condition
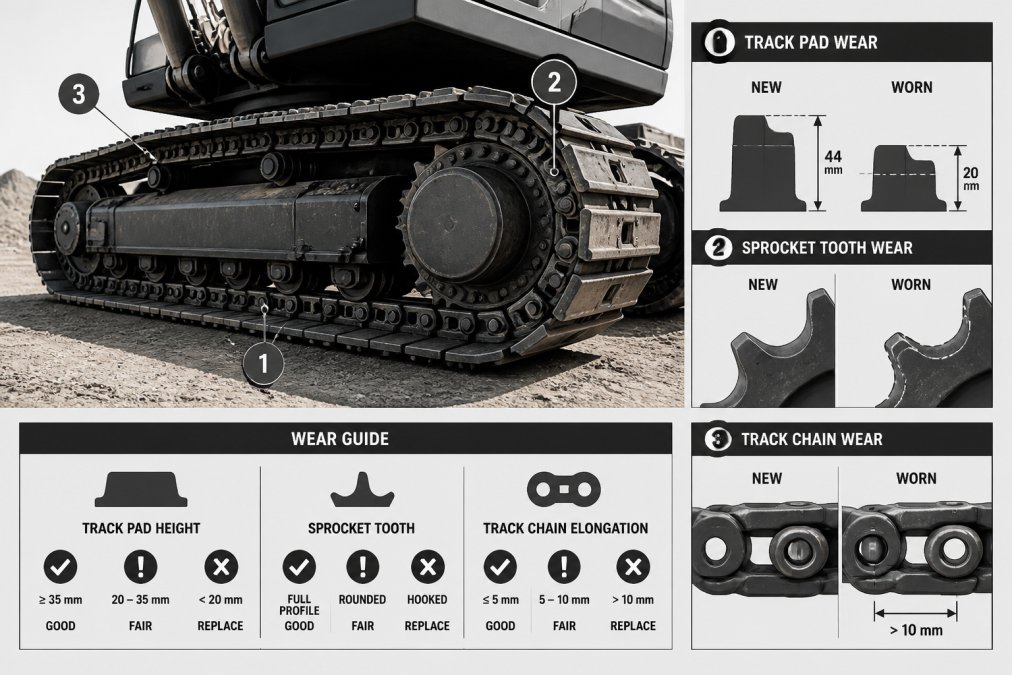
The undercarriage is where the real story emerges. Track condition, idler wheels, sprocket wear, and master link integrity determine how much life remains in the machine's foundation. This is the most expensive component to replace.
Get the machine on level ground and inspect from underneath with a flashlight.
Track Chains and Crawler Belt: Track wear is measured in millimeters. A new track has approximately 18-20mm of pin and bushing play. If you can move the track more than 30mm side to side, replacement is imminent. Look for broken or missing links; widespread damage means full replacement.
Sprocket and Idler Wheels: The sprocket teeth should be relatively uniform and sharp. Worn teeth are rounded or hooked, which accelerates track wear. Idler wheels should spin freely with minimal wear. Spin each wheel by hand; it should rotate smoothly.
Master Link and Fasteners: Inspect the master link for cracks, corrosion, or looseness. All fasteners should be tight.
Structural Integrity: Look for cracks in frame rails. Small cracks can be welded, but extensive cracking suggests deeper structural problems.
Step 4: How to Check Hydraulic Pressure and Fluid Condition
The hydraulic system is the excavator's circulatory system. Contaminated fluid, low pressure, or leaks compromise every function the machine performs.
Measuring Hydraulic Pressure: Connect a hydraulic pressure gauge to the main hydraulic line while the engine runs at idle. Normal hydraulic pressure ranges from 200-350 bar depending on the model. Test pressure under load by operating the boom and arm at full extension. Pressure should remain stable and within spec.
Checking Hydraulic Fluid Condition: Hydraulic fluid should be clean, amber-colored, and free of debris. Contaminated fluid appears dark, milky, or contains visible particles. Milky fluid indicates water contamination. Hold a fluid sample up to light; you should see through it clearly. Smell the fluid, it should have a slight mineral oil odor. A burnt smell indicates overheating.
Check all visible hydraulic hoses and connections for leaks or seepage.
Step 5: Inspect Engine Components and Fluid Analysis
Visual Engine Inspection: Start with the engine cold. Look for oil leaks around the engine block, cylinder head, and oil pan. Check coolant level and condition, it should be bright green, orange, or pink. Murky or rusty coolant suggests contamination or overheating history.
Inspect the air filter for clogs or dirt. Look for signs of engine blow-by, oil residue around the air intake or breather indicates worn piston rings.
Starting and Running the Engine: Start the engine and listen for unusual noises. A healthy diesel engine produces a steady, rhythmic sound. Knocking, grinding, or rattling indicates internal damage.
Watch the exhaust smoke. A small amount of white smoke on cold startup is normal. Continuous white smoke suggests coolant leaking into cylinders. Black smoke indicates incomplete combustion.
Let the engine idle for 5 minutes and check that it runs smoothly without stalling.
Fluid Analysis: Request an oil analysis report if available. Check engine oil level and condition, it should be dark but not black. Excessively dark oil suggests the engine is overdue for an oil change.
Step 6: Test Performance Under Load and Verify Electrical Systems
A machine running at idle tells you very little. Testing under load reveals whether hydraulic pressure holds and whether all systems respond correctly.
Performance Testing: Operate the excavator through a full cycle: raise and lower the boom, rotate the upper structure 360 degrees, extend and retract the arm, and open and close the bucket. Each movement should be smooth and responsive.
Test swing speed by rotating the upper structure. A healthy swing bearing rotates smoothly. Lower the bucket under full load; the machine should lower smoothly and hold position without drifting.
Electrical System Check: Check that all lights function: work lights, backup alarm, and warning lights. Test the horn. Verify battery terminals are clean with no corrosion. Test air conditioning or heating if equipped. Check that all cab instruments function: fuel gauge, hour meter, temperature gauge, and warning lights.
Used Excavator Inspection Checklist for Auction Purchases
Use this checklist when inspecting used excavators before buying, whether from private sellers or auctions.
| Inspection Area | What to Check | Pass/Fail | Notes |
|---|---|---|---|
| Service History | Maintenance logs and records available | ||
| Operating hours documented and verified | |||
| Recent fluid changes and filter replacements | |||
| Visual Condition | No cracks in boom, arm, or frame | ||
| Minimal rust corrosion on exterior | |||
| Cab glass and seals intact | |||
| Undercarriage | Track chains intact with minimal wear | ||
| Sprocket teeth uniform and sharp | |||
| Idler wheels spin freely | |||
| Master link secure and undamaged | |||
| Frame rails straight with no cracks | |||
| Hydraulic System | Hydraulic pressure within spec under load | ||
| No visible leaks on hoses or connections | |||
| Fluid clean, amber-colored, no contamination | |||
| Engine | No oil leaks from engine block or seals | ||
| Coolant clean and at proper level | |||
| Air filter clean | |||
| Starts smoothly and idles without stalling | |||
| Performance | Boom raises and lowers smoothly | ||
| Arm extends and retracts without lag | |||
| Bucket opens and closes responsively | |||
| Upper structure swings smoothly | |||
| Electrical | All lights function | ||
| Battery terminals clean, no corrosion | |||
| Hour meter functions and matches records |
Take photos of every major component and any damage you find.
Buying used excavators requires due diligence, but the process becomes manageable when you know what to inspect. The seven-step approach above covers the systems that matter most: service history, structural integrity, undercarriage condition, hydraulic performance, engine health, real-world performance, and electrical function. Document everything in writing, trust your instincts, and don't hesitate to walk away from machines that show red flags.
EquipMarket's marketplace makes it easier to connect with verified sellers who can arrange inspections and answer technical questions directly. Use this inspection guide as your framework, and you'll make confident purchasing decisions that protect your equipment investment.
Frequently Asked Questions
What should I look for when inspecting used excavators before buying?
Start with service records and operating hours, then inspect the undercarriage for track wear and hydraulic leaks. Check engine fluids for contamination, test hydraulic pressure, and look for structural cracks or corrosion. Run the machine under load to verify boom and arm movement, bucket cycle times, and electrical function. Verify emissions compliance and financing paperwork before closing the deal.
How do I assess excavator undercarriage wear and track condition?
Examine the crawler belt, sprocket teeth, and idler wheels for visible wear. Check pin and bushing play by applying side pressure to the track. Look for broken links or master link damage. Measure track sag and inspect for rust corrosion. High wear indicates heavy use; severe wear may signal the need for costly replacement. Undercarriage repair costs can exceed several thousand dollars.
How do I check hydraulic pressure on an excavator?
Locate the hydraulic pressure test port on the main boom line. Attach a calibrated pressure gauge and run the engine at operating RPM. Activate the boom, arm, and bucket separately while recording pressure readings. Compare results to manufacturer specifications. Low pressure suggests pump wear; erratic readings indicate internal leakage. Inspect hoses and fittings for visible hydraulic leaks before testing.
What are the most important tips for inspecting excavators at auctions?
Arrive early to inspect thoroughly without time pressure. Bring a checklist covering undercarriage, hydraulics, engine, and electrical systems. Test the machine under load if permitted. Verify service records and operating hours. Check for flood damage or frame cracks. Ask about warranty or return policies. Use digital diagnostic tools to scan engine codes for hidden problems. Never bid based on appearance alone.